Project 1 - Photograms
William Henry Fox Talbot (1800-1877), inventor of photography, produced his first invention of a photograph which he named 'photogenic drawing' (1834) and in the following year his first camera negative. This consists of a 'dark room' which has no source of light except a 'red LED light' which differs from a white light because the paper used to create these photographs react with white light. When objects are placed directly onto the surface of a 'light-sensitive photographic paper' and then once it's been shone upon, it reacts with the white light and creates the final photograph. The paper is then developed by using light-sensitive chemicals in the dark room.

|

|

|
Progress
When it comes to making photograms, wether it is for a digital camera roll or simply placing object on top of the paper, you have to follow certain steps and precautions before creating you final photograph.
|
Dark room- Red light and no white light exposure Placement- Place paper beneath light source and move the light further up or down the paper, depending on how big you would like the picture to be and how large the paper is. Suggested to keep a guard that blocks the light from touching the paper when fitting. Exposure - Once confident of the placement, more guard away allowing the light to hit the paper exposing it to light and creating a photograph. Developing · Carefully place the photograph into the developer solution for 1 minute. You will start seeing the photograph develop. · Move into stop bath for about 30 seconds. · Place image onto the fixer for 3 - 5 minutes. · Finally place photograph into water and wait 10 minutes. Drying -Let photograph drying or place into a dryer and your photograph will be complete. 
|


|
my work
Movement

Sandwich print

Painting with developer

Weaving

Project 2 - PINHOLE CAMERA
A pinhole camera is a normal camera without a lens but with a small aperture. This aperture is created by the small hole created that will allow light to get in and will produce the photograph. It is a light proof can that the only source of light allowed in is through the small hole projecting the image presented opposite the can.
Ben Nathan
Nathan is an artist that is based on taking photographs through a pinhole camera. His artistic practice reflects on the functionality of the city and its industry, documenting the evolution of urban change. He walking through urban streets and capture portraits and body-length photographs of pedestrians in the street. His work is displayed below.
Nathan is an artist that is based on taking photographs through a pinhole camera. His artistic practice reflects on the functionality of the city and its industry, documenting the evolution of urban change. He walking through urban streets and capture portraits and body-length photographs of pedestrians in the street. His work is displayed below.

|

|

|
The creation of the pinhole camera
|
|
Get a section of black cardboard paper and cut at the length of 22x7cm. Cut sections of 1 cm and cut them evenly. Also cut a circle that is the same size as lid for later use. Take a can opener and a tin can of your liking and open the lip of the can. Make sure to sand down the edges so you don't cut yourself. Wrap around the can and bend the 1 cm sections covering the open section of the can. Then place the circular cut out and place on top. Secure the lid with duck tape and make sure it is tight so no light can get in with may affect the outcome of the final photo. Poke a hole thru the middle of the camera allowing light to get in which will produce the photograph.
|
|
MY work
For the work set, we were told to take different photographs and objects as we experimented with the pinhole camera.
- From a window looking outwards
- Involving a person (stand still!)
- Double exposure portrait
|
Original

|
From a window looking outwards
|
Inverted

|

|
Portrait
|

|

|
Corner of a building
|

|
Project 3 - The film camera
The camera
· The camera is corralled by the photographer which controlles the amount of light coming through the lens via a shutter mechanism and aperture, before finally reaching a strip of unexposed film. This camera allows to follow the concept of a cameras obscura as an image is projected into a dark box and presented onto the unexposed film.
|

|
|
LOADING and developing the film
|
Loading the roll of film into the camera
|
Developing the film
|
|
The roll will usually come in box and inside you will find a cylinder shaped box that has no light coming into it so the roll isn't exposed. When picking up the roll decide upon what lighting conditions will be present for desired photography which is ,easier by the iso signified in the box of film. Once you have your film, place it to one side and open up the camera by the circular piece on the left hand side of the camera. The circular piece will have an arrow indicating in which direction you will be spinning it. That is how you identify the circular piece. You will find a small knob tucked into the circular piece that you are able to pull out simply by pulling it and extracting it from the piece. You are now able to pull the disk up. As gently as you can, pull on the disc allowing he back door of the camera to open up which is where you ill be placing your roll. Take out the cylinder box with film roll inside. There should be roughly an inch of film hanging out of the roll of film. This is called the leader. Take the roll of film and lay it on top of the cradle (not in) on the left hand side. Pull on the disc allowing the roll to fall into place in the camera. Pull on the leader across the camera. Once the film has reached the other side of the camera, you must lock the film into the winding mechanism so that the film will move across the film plane when it is winded after every exposure. Slide the leader into the winding mechanism. Place the film roll holes on a sprocket to secure into place to once rolling the film, it doesn't slip out. Using your left hand, find the film advanced leaver and pull on it with your right thumb. Repeat the last step 3-4 times to make sure the roll is secured onto the camera ready to be exposed. You are now able to shut the back door Pull the leaver 2 more times. Pull down the knob on the disc.
|
Place your film canister, bottle opener, scissors, and developing tank into your changing bag and zip it up so no lights gets in preventing the film from being exposed. Using your bottle opener, take the lid off of the film canister. remove the film by only touching the edges and cut off leader. Place your film onto the reel. The reel should have two nubs indication the entry in the dark making it easier to find, and slide the film a few inches into the reel. The reel has a twisting mechanism allowing the film to roll faster. Twist the reel a few more times to the end inside. Put the reel into the developing tank in the center and place the lid of the tank until tightly secured. You are now able to remove the tank from the bag as no light will get in. Using a measuring vessels to separately dilute your developer, fixer, and stop bath with the proper amount of water according to the instructions provided. Start of by measuring that the water is at 20°C and use hot or cold water to get the exact temperature. Must use distilled water to guarantee your negatives won't have mineral spots. Pour developer into the tank and tap the bottom of the tank against a table to eliminate air bubbles that may cause the film to not fully develop on some spots. Spin the tank for 30 seconds and turn your tank upside down for 10 seconds. Repeate this process for 10 minutes. Now pour your developer out of the tank. Pour your fixer into the tank and turn for 30 seconds and turn upside for 10 seconds every minute for five minutes. Pour your fixer out of the tank and into a reusable fixer bottle. Your film is now developed. Wash film with water for approximately five minutes. Remove reel from tank and gently remove film from the reel. Use specialised film squeegee to remove all the water still on the film. Hang your negatives with clothing hanger to dry in a dust-free environment. Wait a few hours to fully dry.
|
My first film
For the first task using a film camera, we were given 36 exposure roll of film with an ISO of 400 and completed the following tasks. The task was to experiment the effects shutter speed and aperture has on photographs .
|

|
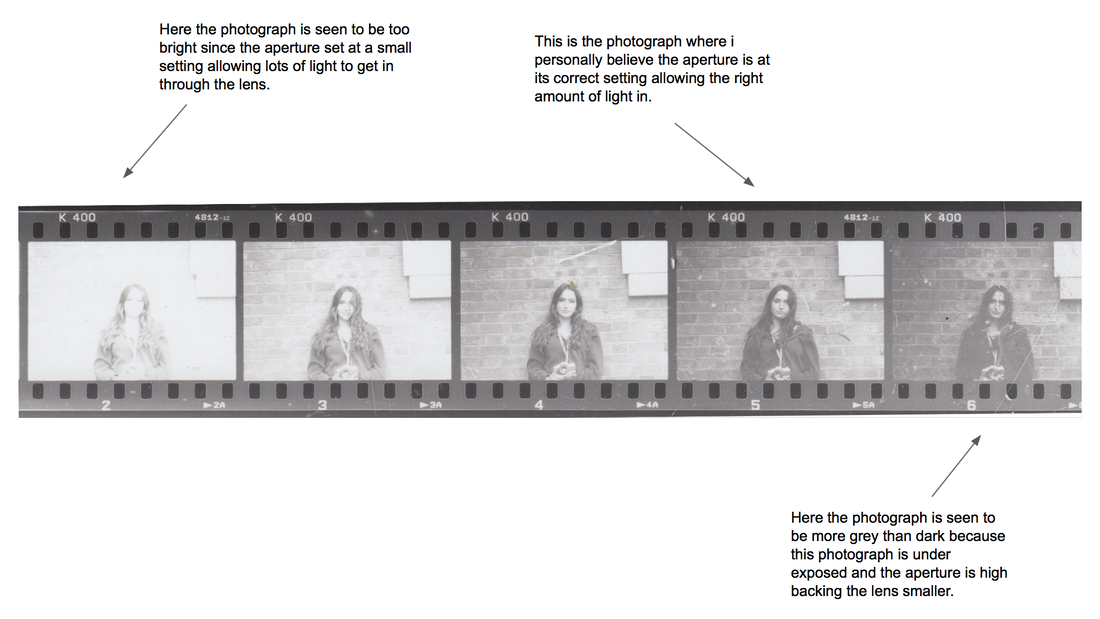
Aperture
|
Aperture - is a hole or an opening through which light travels. The changing of the aperture controls how much light comes in and out of the camera.
We were told to take portraits with Speed Setting = 1/125 second, Aperture Settings = f4 to f16. This experimented with the aperture mostly as we switched it when taking the photographs. This created the photographs to differ from bright or dark photographs. This is afferent as the sun light may be not as bright as other days. Through this experimentation, this allows us to know how much light the camera needs to take a property exposed photograph. When it came to taking these photographs, I got my model to stand still against a wall took several photographs. The final product came out with the same idea of the photographs but with different brightness. |
|

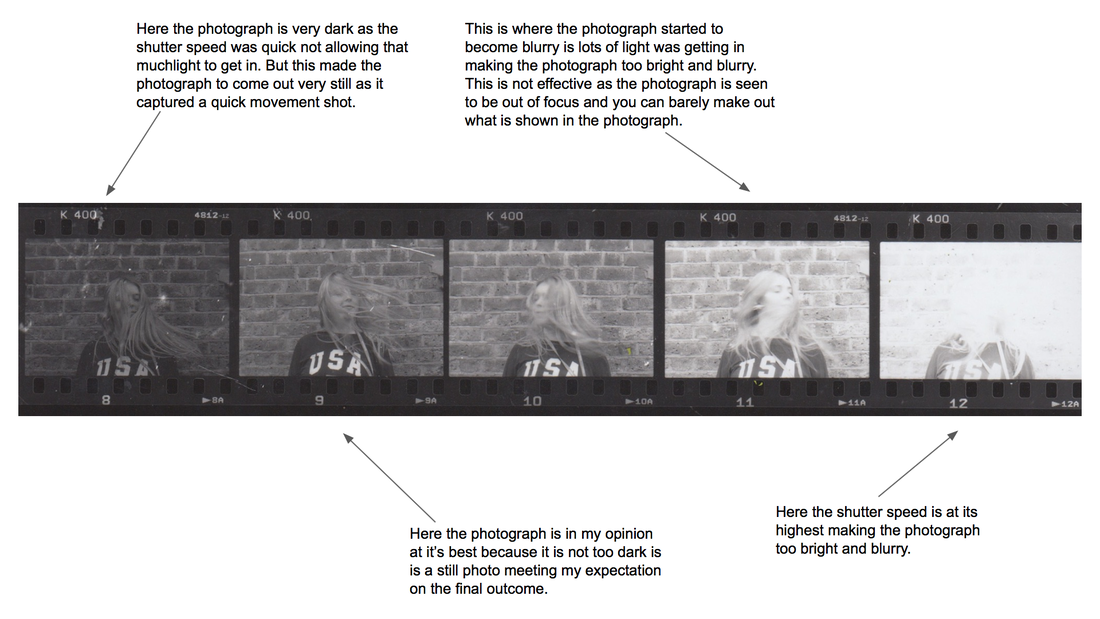
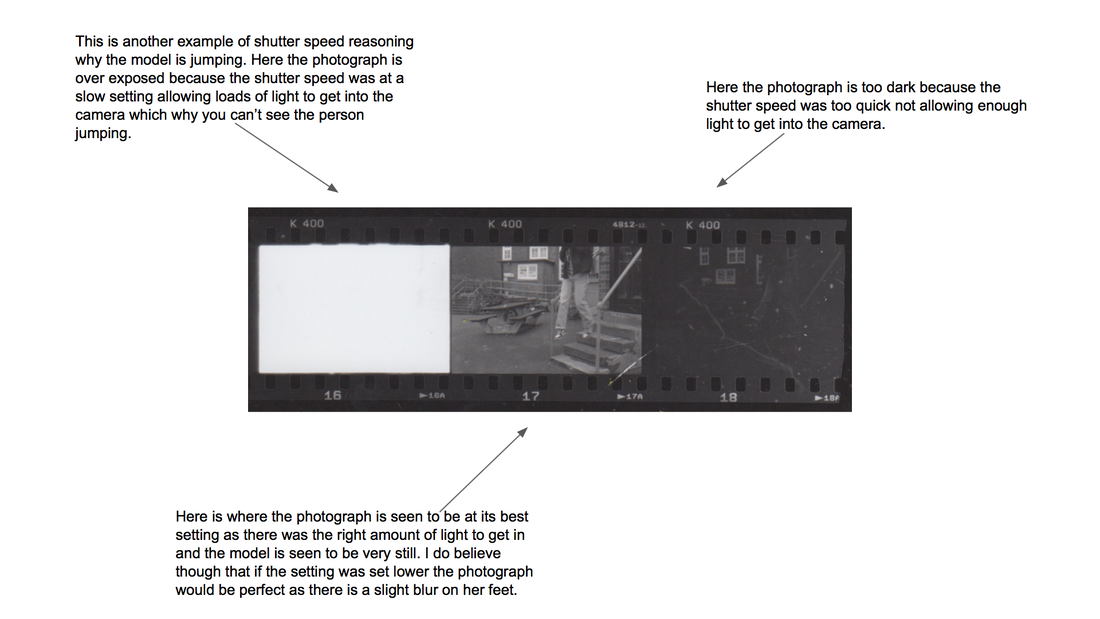
Shutter speed
Shutter speed - the length of time that the film or digital sensor inside the camera is exposed to light when taking a photograph.
For this task we were told to set our camera to aperture f8 and change the shutter speed through 1 second (1"), 1/125 second, 1/500 second. For this experiment to be affective, I got my model to shake her head to see how the shutter speed affects the image captured and whether it will be a still photograph or blurry. For this experiment,
For this task we were told to set our camera to aperture f8 and change the shutter speed through 1 second (1"), 1/125 second, 1/500 second. For this experiment to be affective, I got my model to shake her head to see how the shutter speed affects the image captured and whether it will be a still photograph or blurry. For this experiment,
|
|


|

|
